Updated January 2021
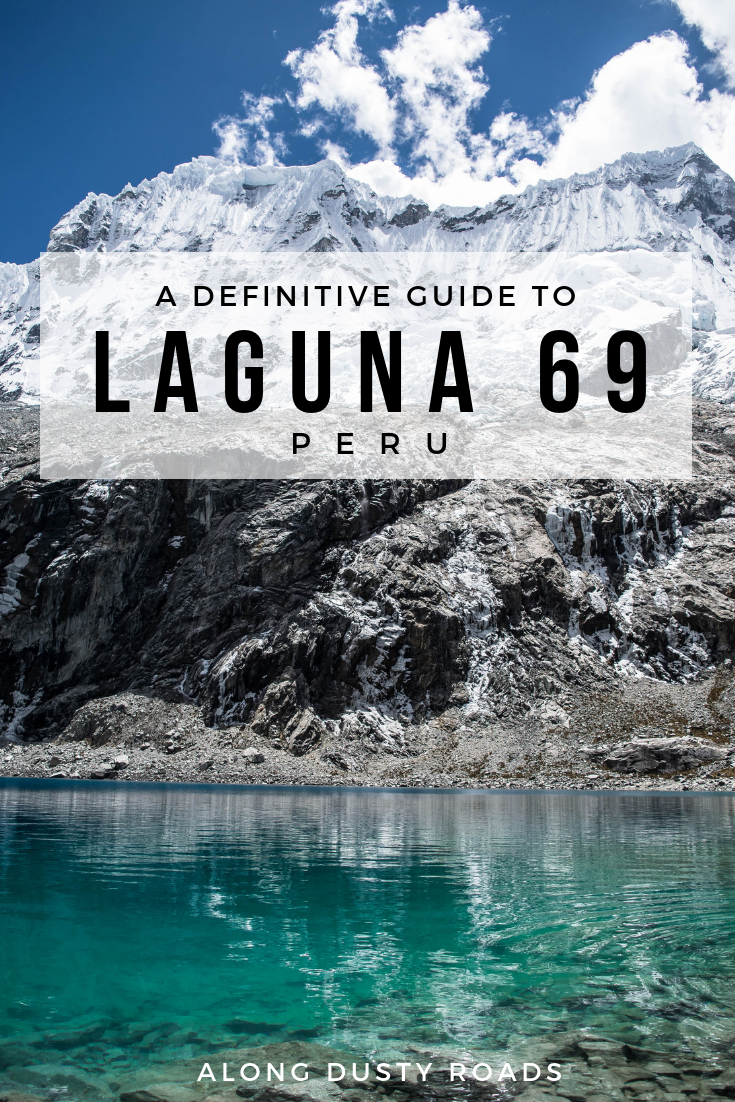
One of Peru’s most famous lakes, the hike to Laguna 69 is almost a right of passage for visitors to the Andean country. In this guide you’ll find out everything you need to know to plan your visit, including why you should take a tour, what to expect, what to pack and some nifty tips we picked up along the way!
Situated in the the hiker’s paradise of the Huascarán National Park, not far from the city of Huaraz, Laguna 69 has become a destination in itself and an increasingly popular day trip that breaks up many journeys through the north of Peru.
Yes it’s at high altitude, yes it’s not the easiest hike, but my goodness is it worth it. In a world where we are surrounded by images of beautiful destinations across the globe, it’s often the case that the reality just doesn’t live up to the photos - Laguna 69 however exceeded our expectations and then some!
Here’s everything you need to know to plan a day trip to Laguna 69 from Huaraz, including how to get there (and whether you really need a tour), how to handle the altitude challenges, and what to pack.
The Laguna 69 Hike: The Essentials
Altitude | The lake itself sits at 4,600m, with the hike beginning at around 3,800m.
Distance | 14 km round trip
Time | This is a long day trip from Huaraz, with most tours departing around 5 a.m. and not returning until 6 p.m.
Base City | Huaraz
Tour or Independent | It’s possible to do this hike independently but, as we discuss later, a tour is now actually cheaper so makes much more sense.
A Complete Guide to the Laguna 69 Hike
The importance of ACCLIMATISATION
Throbbing headache, loss of appetite, nausea, lethargy, altered sleep patterns, shortness of breath.
Also known as altitude sickness, the above are a set of symptoms that the human body can experience once passing beyond 2,500m. This is when the the air gets thinner, oxygen levels decrease and - for those not used to being at higher altitudes - your body tries to tell you that it’s not okay with that.
Usually not something many of us need to worry about, but in South America, a part of the world where there are countless mountains, lakes and even cities at heights that dwarf many of Europe’s highest peaks, higher altitudes and the potential effects of being at them are something that you will need to not only be aware of, but prepare for - in a process called ‘acclimatisation’.
And that’s exactly why when arriving in Huaraz - which is already at 3,000m - you will need at least one full day of just hanging out in the city before attempting to hike to Laguna 69.
In short, your body needs to get used to simply functioning on less oxygen, before you ask it to go any higher.
We suffered only minor headaches because of the altitude, but other people along the trail were really struggling. An English guy we met did the hike two days after landing in Lima from the UK and he said his body had never felt so awful.
Secondly, and this actually applies to all those planning a trip to Peru, you need to ensure that your level of fitness is of a relatively good standard prior to boarding the plane. For us and many other travellers , Peru equals hiking and there’s no doubt that many of its most beautiful and magical sites are found at the end of a dusty trail. So, to get the maximum amount of enjoyment out of your time in the country, do a few hikes at home before your visit so your body and Peru experience doesn’t suffer.
We promise, you won’t regret it.
Want to know more about altitude sickness in Peru and how to prevent it? See this post.
Is the Hike to Laguna 69 Difficult
Given that Laguna 69 has a reputation as being a bit of a ‘gringo-killer’, we wanted to address this question right off that bat.
It’s true that this hike is by no means a walk in the park. The altitude is a killer, and if you’re not used to hiking in it, even the fittest individuals will struggle with breathlessness a little. However, with the right mindset and preparation - that means taking the time to acclimatise, perhaps taking on a couple of shorter hikes, and putting in some days out in the hills at home - the vast majority of visitors to Huaraz should be able to enjoy this spectacular hike without too many issues.
Why is it called Laguna 69?
When the Huascaran National Park was created in 1975, all the lakes within it needed to be accounted for. And whilst many in the region already had names - such as the Llanganuco Lakes, Chinancocha and Orconcocha - many others did not. Instead, they were simply given a number, and for this particular lake, that number was 69.
How to get to Laguna 69 From Huaraz
When considering how to get to Laguna 69, there are three main options depending upon your budget and fondness for independent travel: public transport, with a taxi, or with a tour.
When we visited Huaraz the first time in 2015, we were on a super tight budget, and had gotten used to experiencing Latin America independently. We looked into a tour, but decided that the small saving made by getting there ourselves and the chance to experience the stunning lake without the presence of large groups was was worth it.
Fast forward to our second time in the Huascarán National Park in 2018, and things had changed. The hike had increased significantly in popularity, tour costs had dropped, and the converse increase in public transport prices (without any of the connection issues being improved) meant that visiting Laguna 69 independently is now - surprisingly - the more expensive and significantly convoluted option.
If you’re a long time reader of Along Dusty Roads, you’ll know that we love a DIY adventure, but at least for the foreseeable future, we absolutely recommend taking a tour to the this magical lake instead.
Note that we have still included the means for getting there independently (along with advice on taking a taxi), as we know that it will always appeal to some.
How to Get to Laguna 69 With a Tour
As we mentioned above, a tour is now by far the most popular way of reaching Laguna 69 - and with prices in town as low as S/. 30 (£7 / $9) per person, it’s hardly surprising.
Be aware that prices can vary a little between agencies, with the above being offered by our hostel, (Akilpo - which we highly recommended having stayed there twice now, across two trips), whilst elsewhere S./35-40 is fairly standard.
By all means shop around to see what you can find but do note that every agency in town - of which there are far more than you’d think - has tours to Laguna 69, so it may take some time, for not necessarily much benefit.
Once you’ve got your tour booked, the most important this to be aware of is that 'tour' is actually a pretty loose term for this day excursion, as it doesn't usually include a guide. In fact, the tour fee usually only includes transport to and from the lake with a few stops for photos.
Whilst it shouldn't bother you that you don't have a little man full of facts to escort you on your hike, what may cause you problems is that you don't have said little man to cajole the whole group into keeping up a decent pace and to a certain timescale.
With a large group, all with different fitness levels - and adjustments to the altitude - it can be a little like herding cats, and should you complete the hike at a reasonable pace, you may find yourself back at the bus waiting quite some time for stragglers to catch up.
The Details
Cost | S/. 30 - 40, plus S/. 30 for a one day pass into the national pass entry. Note that if you intend on hiking a number of trails within the park - or later taking on the Santa Cruz trek - it may well be more cost efficient to invest in one of the multi-day passes
Travel time | 5 a.m. departure from Huaraz - return times are uncertain but you'll usually be back in at your hostel between 6 p.m - 7 p.m. if all the stragglers have made it back.
Pros | It’s now cheaper, more convenient, and provides a more comfortable direct ride between Huaraz and the lake entrance. The opportunity to stop off and photograph a couple of the pretty lakes on the road up to Laguna 69 is also a bonus.
Cons | Having little opportunity to enjoy the lake without others and the frustration you may feel at waiting for people in your group who are either too unfit, too selfish or too complacent to return by a certain time (we know this sounds a bit harsh, but this happens waaaay too often whenever we take a day tour).
How to Get to to Laguna 69 by public transport
The saviour of the budget backpacker in Latin America is without a doubt the collectivo, a familiar dilapidated white minivan that ferried us between destinations for the 2.5 years that we’ve spent in Latin Amcerica. They are not always fast, but they leave frequently and are almost ALWAYS the cheapest option for getting from A to B (yep, that was the case back in 2015 for this hike!).
The difficulty with taking this option in Huaraz, as it turned out, was not so much getting to A but getting back from B.
If you plan on taking public transport in both directions, you're going to need to get up VERY early. The first collectivos leave Huaraz at between 5.30 a.m. and 6 a.m. - you NEED to be on one of these heading to Yungay. The minivans leave from Simon Bolivar, a block or so past the bus long distance bus companies - just ask a local to point you in the right direction. Driving time is around one hour and should cost no more than 5 soles per person.
The minivan will drop you off in Yungay at a car park which doubles up as a bus station. As soon as you clamber out of the door, you will be set upon by taxi and collectivo bus drivers vying for your business. You can either commission a private taxi to the lake entrance, wait around for others to split the taxi costs with you or take a seat in another collectivo.
Unless you splurge on a private taxi, whichever option you take should be the same price. Do bear in mind however that both vehicles end up being rather full and cramped, especially for those with long legs. The price is fixed artificially high for this section of the hike, costing around 20 soles per person, and the bumpy, winding drive should take no longer than 1.5 hours. Although all the drivers will know Laguna Sesenta Neuve, the drop off point might also be referred to as La Cebolla.
Along the way, the taxi or collectivo should stop in order for you to buy your boleto touristico before continuing on for another 15/20 minutes to the hike entrance. As mentioned above, a one-day pass costs 30 soles.
If you're fit and acclimatised, the hike from the entrance up to Laguna 69 should take no more than three hours, and two hours down. It is an absolutely stunning trek and one of our Peru highlights.
The biggest problem with using public transport arises once the hike is over. The last reliable connecting collectivo back to Yungay passes the carpark entrance at 3 p.m. according to some, 4 p.m. according to others. This means that, even if you're on the first collectivo out of Huaraz in the morning, you probably don't have the time to be at the lake's edge for any more than 45 minutes to 1 hour at the absolute max.
Despite zipping up and down on the hike (and spending 1 hr 45 mins at the waters edge), we didn't make it back until 3.45 p.m. No collectivo turned up at 4 p.m for us.
Should you miss the last collectivo however, all is not lost.
One option would be to sit and hope a truck passes by with which you can hitch a lift back to Yungay. Or, like we did, you can get a ride back to Huaraz on one of the many tour buses with a few empty seats. This costs the same as public transport (possibly less if you haggle with the driver), but comes with a problem all of its own, as you'll soon discover in the next section.
Cost | S/. 50 for transport, plus S/. 30 entry.
Travel time | This can vary dependent upon whether that elusive colectivo turns up, but expect a very long day, with a 6 a.m. departure from Huaraz and hopefully a 7 p.m. return.
Pros | As ever with public transport, it's much more of an adventure and allows you to hang out with some locals (almost all of whom have excellent hats). Previously, with the tours leaving slightly later and the hike being much less popular, you also had the benefit of being in perfect solitude for large stretches of the hike, however this is now much more unlikely.
Cons | We love independent hikes, but given the recent increase in public transport costs, this is one time that it doesn’t pay to do it yourself. Additionally, there is an issue with the uncertainty of the return leg.
How to Get to Laguna 69 by Private taxi from huaraz
If you are a money rich, time poor sort of traveller, this may well be the option that suits you best - especially if you're travelling in a group of three or four.
For around S/. 180 (£42 / $54) you can commission a taxi to take you from Huaraz, drop you off at the start of the hike and then be there to pick you up when you're done. Although we didn't meet anybody who chose this option, in the process of our numerous internet searches we found many accounts of travellers who did this with no problems.
To organise this, simply ask at your hostel as this seems to be something that they can easily arrange.
Details
Cost | S/. 150 - 180 of the taxi, plus S/. 30 entry for the entry.
Travel time | Although you would still require an early departure for journey to the lake entrance, the taxi would undoubtedly cover the ground quicker that the two options above.
Pros | Convenience, a comfortable direct ride between Huaraz and the lake entrance, and a set return time. This is also the only option that would potentially allow you to get to Laguna 69 before the crowds descend, as you can start as early as you like.
If you are in a group of 3-4 people who don't fancy public transport or a couple who can afford to pay a bit extra, then this is definitely the option we'd recommend as it works out roughly at the same cost as a tour per person.
Cons | You run the risk that the taxi driver will not return to pick you up (this has happened to us in Latin America!), which is why booking with the help of a hostel is recommended.
The Laguna 69 Hike
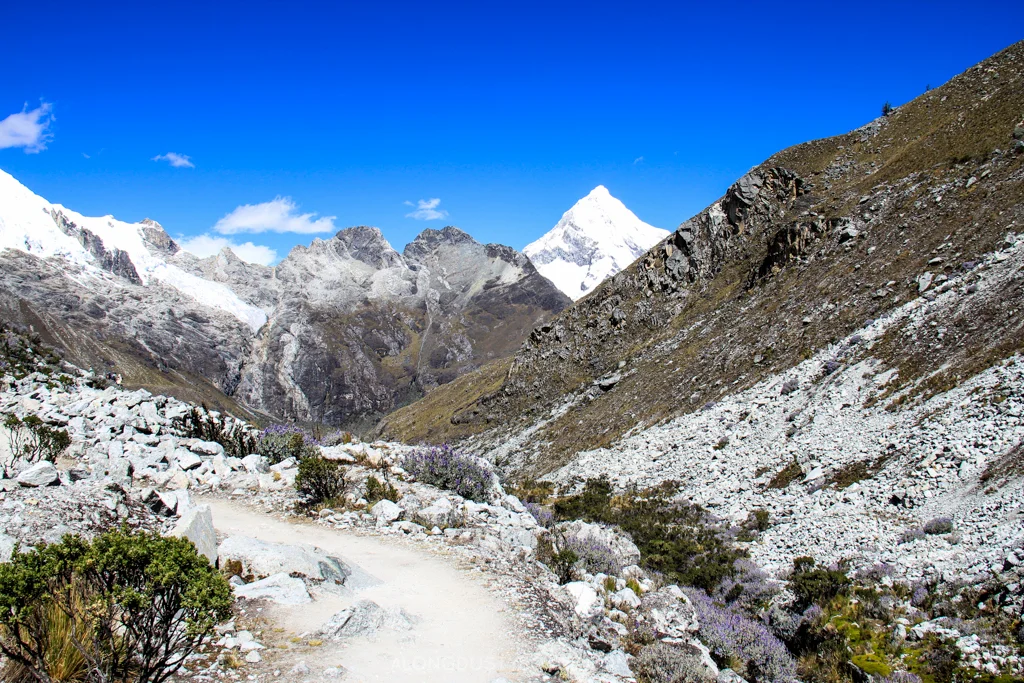
As we mentioned in ‘The Essentials’ at the beginning of this guide, the actual hike to Laguna 69 is not very long - only 7 kilometres one way. It’s the altitude that makes this trek demanding.
The ‘Easy’ First Section
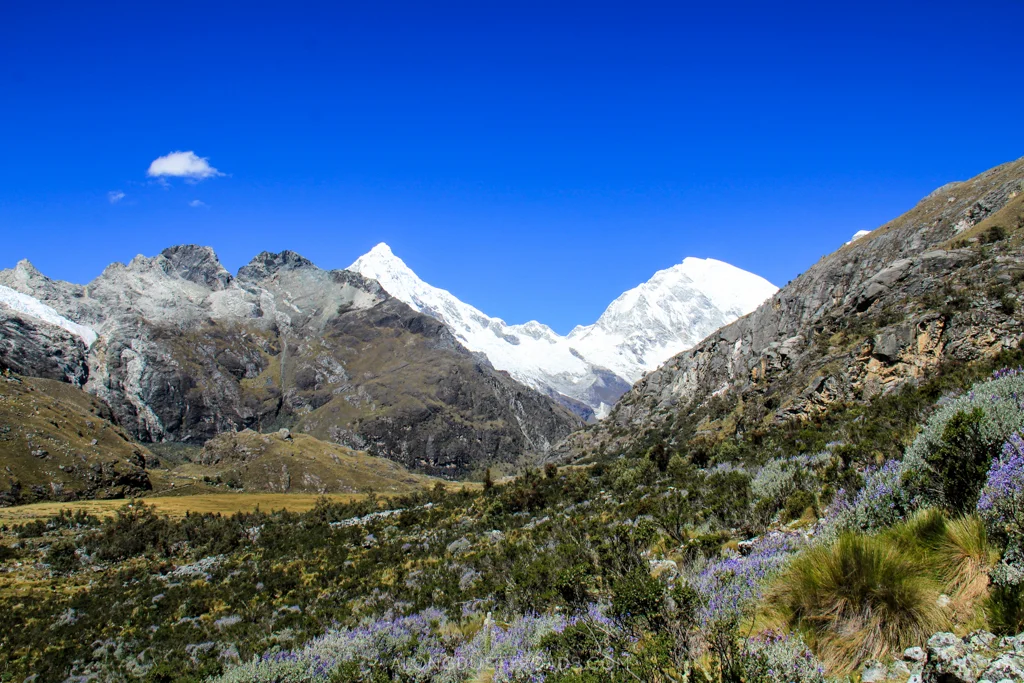
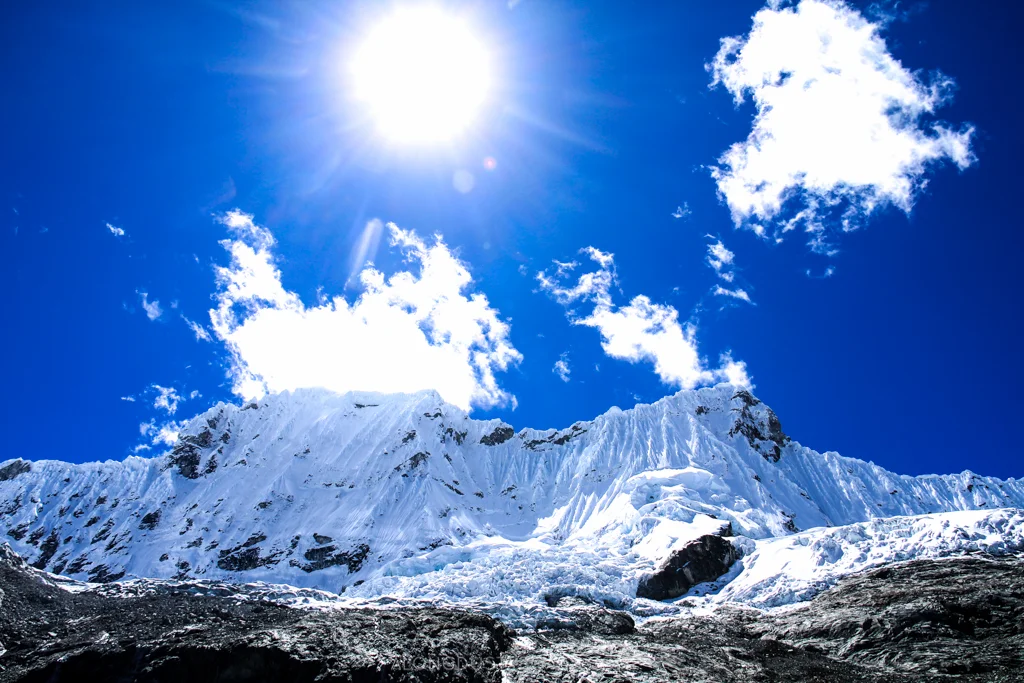
Once you have disembarked from your transport, the trailhead from La Cebolla is surprisingly flat and easy, weaving its way through a meadow and alongside a river that passes between the two giant snow-covered peaks looming in the distance.
This section lasts for approximately one kilometre.
The Second Section
This is where it gets a little tougher, with the beginning of a steep ascent made possible by what feels like never-ending switch-backs.
Take it slow and steady, drink plenty of water and take the coca leaves that your considerate guide may hand out to those he sees struggling.
You’ll know you’ve reached the end of this section when you reach a small lagoon (known as Laguna Esperanza or Lake Hope) and a short flat section.
The Third Section
No matter how fit you are, or how long you’ve spent at altitude, this section is difficult.
After a brief respite, where you pass through grassy meadow, you’ll encounter another set of switch-backs, much steeper than the last, and it’s when negotiating these that you’ll really feel the burn from being so high up. This isn’t helped by the fact that the trail is particularly difficult underfoot, and where if you have the hiking poles, you’ll really, really want to use them!
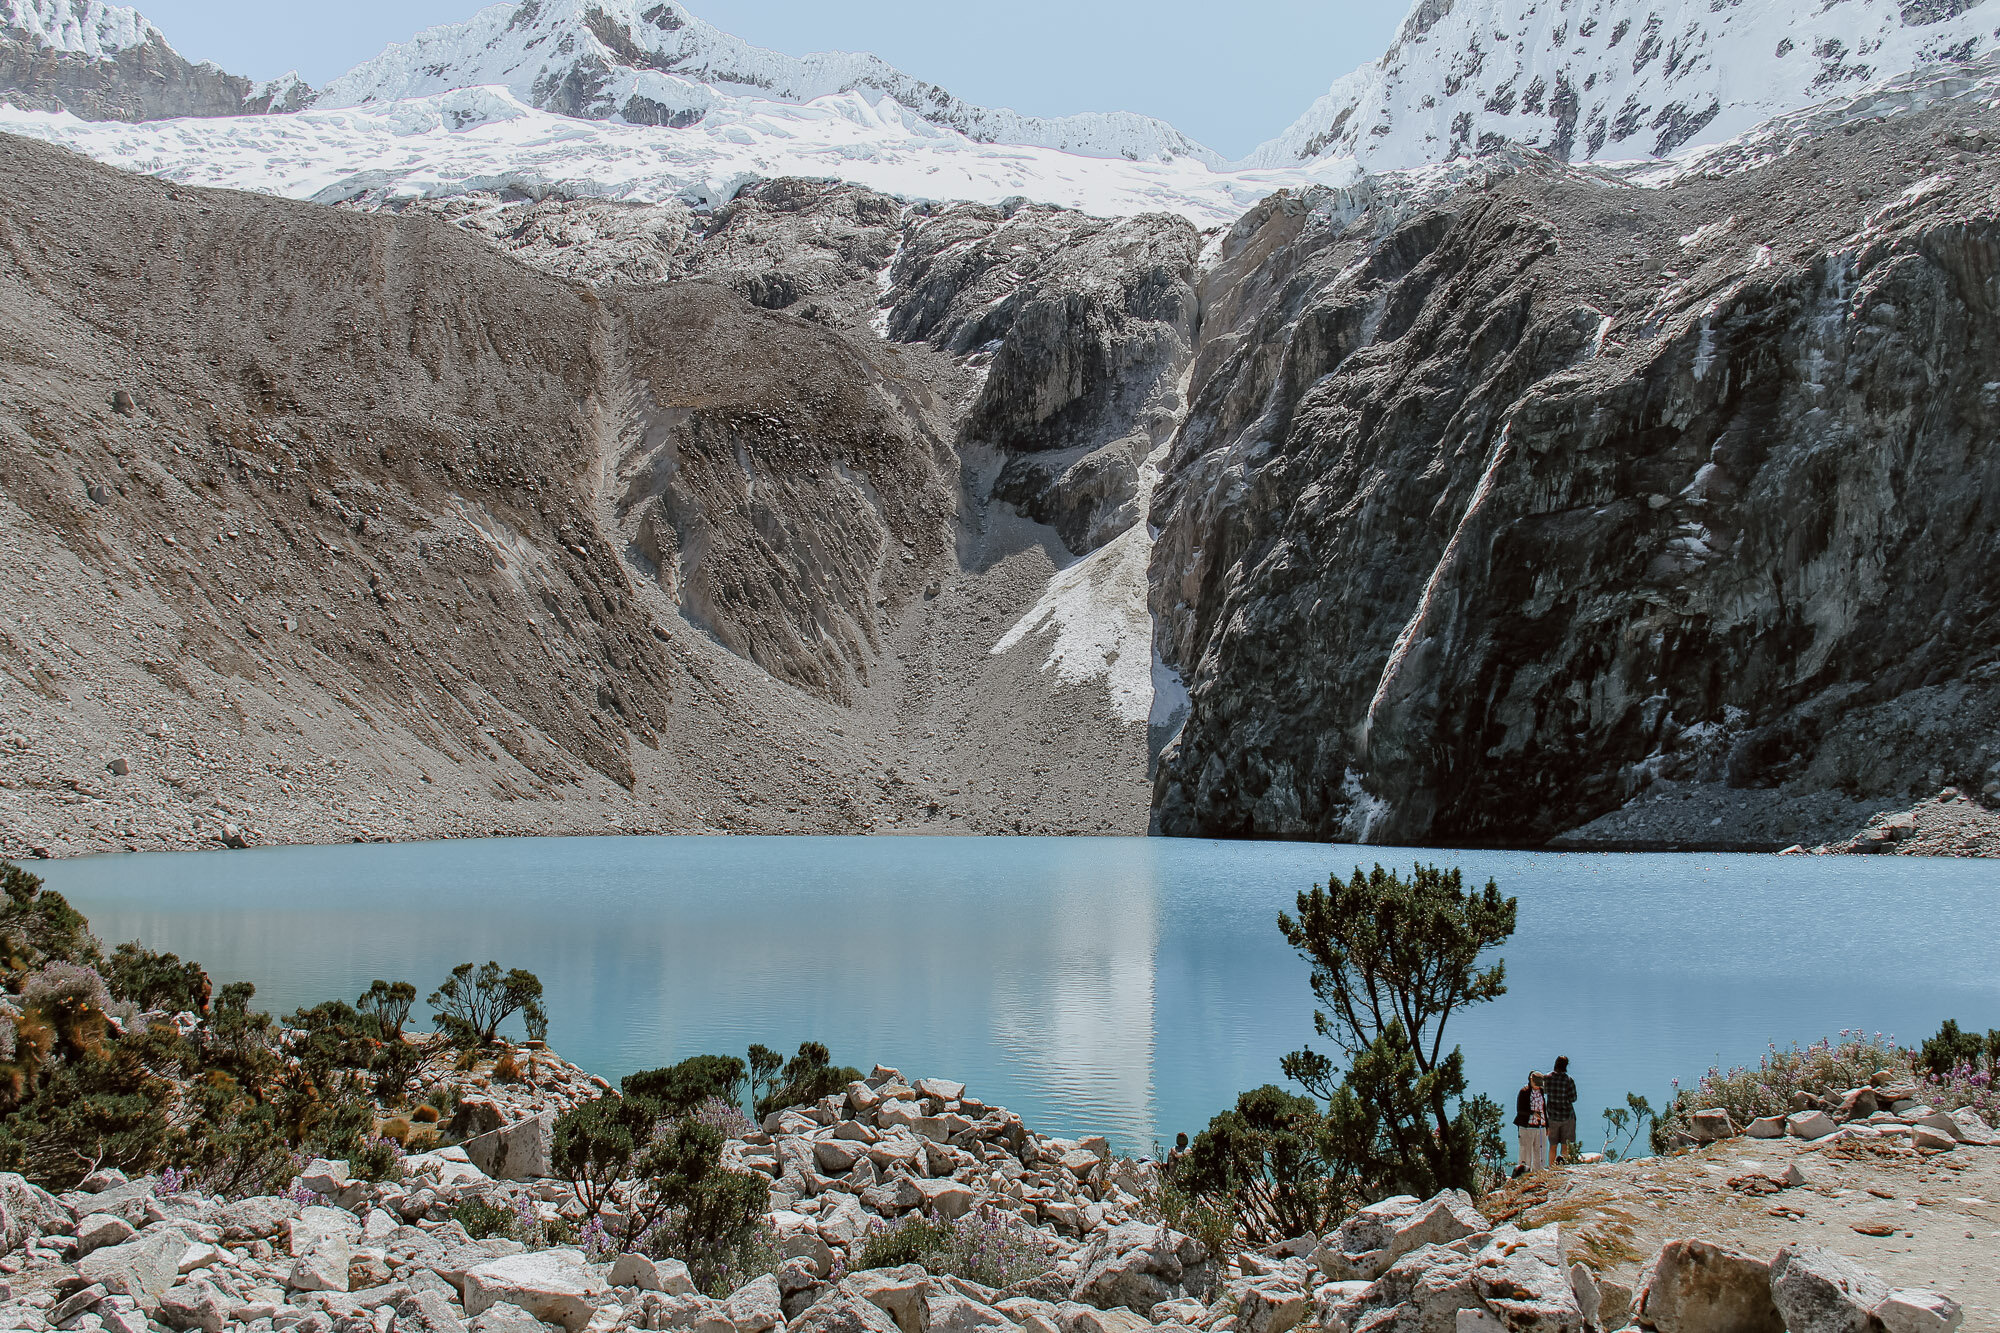
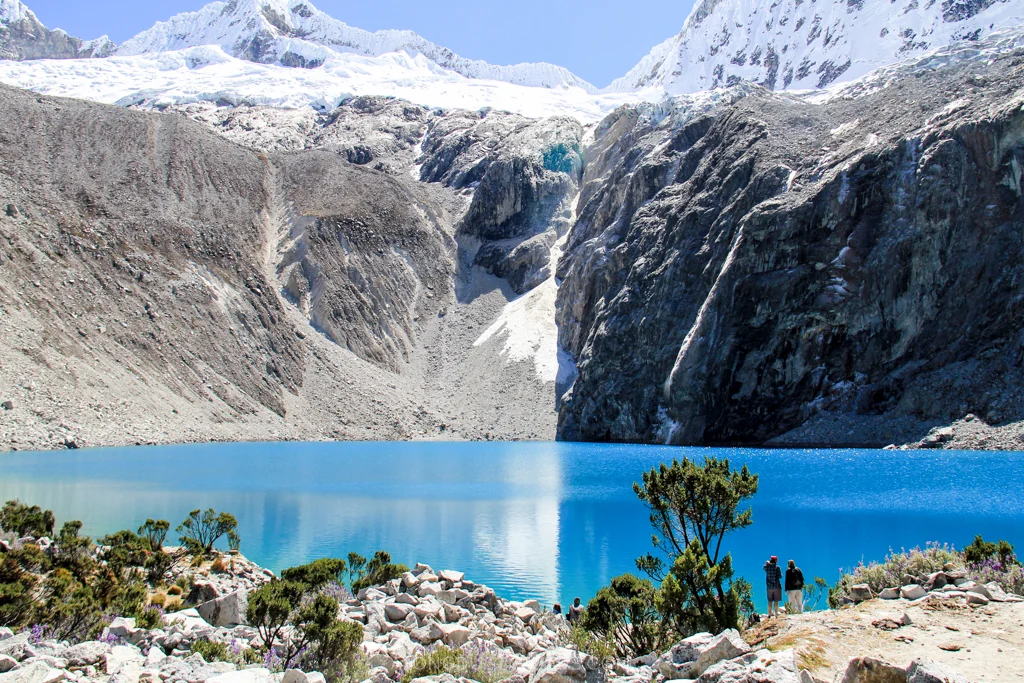
Thankfully, right about the time you begin questioning why on earth you set out on this hike to begin with, you’ll capture your first glimpse of Laguna 69 - and with that, all the pain will (hopefully) be forgotten.
Honestly, it’s so beautiful, we’re certain it has that effect on everyone who it in person.
These three sections combined should take no longer than three and a half hours, and most can complete it within three.
The Lake
If you’re on a tour, you’ll only have 30 or so minutes to enjoy the lake - so make them count.
A couple of crazy guys jumped into the water while we were there, and whilst it was far too cold for us to consider such a thing, it’s certainly an option for the braver amongst you!
Alternatively, pick a spot with a view (spoiler: every spot has an epic view), pull out your preprepared lunch and soak it all in. Oh, and of course, take a thousand pictures.
The Hike Back
Unsurprisingly, the hike back is significantly easier than the way up, which is probably why we took way more photos heading back to the van, than on the way to the lake.
Expect to complete it within two hours.
What to Pack for the Laguna 69 Hike
// Hiking Poles. We didn’t have these when we did this hike, but should we do it again, we’d definitely use them. Any old poles will do, but we’re particular fans of these ones as they’re nice and light and fold down quite small. Not 100% essential, but make every hike we now do (and the recovery) a hell of a lot easier.
// Rain Jackets. Even if you’re hiking in the dry season, this will provide a nice layer of wind-protection. We use these North Face ones, whose breathability makes them great for layering-up.
// Proper Hiking Trousers. We don’t believe that you need to invest in lots of super-fancy hiking gear, but we will no longer attempt a proper trek without proper trousers. Emily uses hiking leggings, whereas Andrew prefers these trousers. They’re a little more water resistant, quick drying, versatile, and light.
// Hiking boots and socks. Some people will certainly attempt this hike in a pair of trainers, but we feel much more confident in a proper pair of hiking boots. The trails can get particularly muddy in rainy season and there’s lots of rocks; it’s just not worth risking your ankles. Emily uses these exceptionally good value ones, whilst Andrew has been very happy with his choice. Also, be sure to invest in a few decent pairs of socks for Peru - we each have a number of these Brasher ones.
// Layers. Even if you’re visiting during the drier months of the year, the weather in here can be a tad unpredictable - and layers will be your friend. We began the day rugged up with countless layers, needing to strip back a little as we - and the weather - warmed up. Oh, and we really appreciated our Merino wool under layers for extra protection from the cold.
// Sunscreen and a hat. High altitude means you’re closer to the sun, and if there’s no cloud cover, you’ll stand a pretty good chance of getting burnt to a crisp if you’re not properly protected. Just don’t risk it.
// Swimsuit. Whilst we certainly weren’t brave enough for a dip in the icy cold waters of Laguna 69, a number of people around us did - apparently it’s quite refreshing!
// Coca Leaves. Depending on how well acclimatised we are, we’ll sometimes take a bag of coca leaves with us on high-altitude hike. These are easily sourced in the local market, and genuinely help with the effects of altitude.
// Water and Snacks. Unsurprisingly, once you get to the trailhead, there is nowhere to buy food or drinks on this hike. Ensure you bring plenty of water (in a water bottle with an in-built filter, that way you can fill-up from one of the many water sources along the way - and help the environment), and snacks to keep you going.
// A Head Torch. Should everything go to plan, this should never need to be used. If on the other hand you get a little lost or take a little longer and the sun begins to go down, you’ll be glad to have a light source to guide the way.
// A Small First Aid Kit. Again, hopefully you’ll never need it (most tour buses also have their own small kit) but having a few supplies in case something bad happens is always a good idea. Ours certainly came in handy when Emily got bit by a stray dog 25km into a 30km hike.
// Leave No Footprints. Remember to respect the location, and discard of any litter appropriately.
// A Camera. Honestly, this lake is so incredibly stunning, you’re going to want to photograph every inch of it! Find out what’s in our camera bag.
// Travel Insurance. Most travel insurance policies exclude cover for activities at high altitude. This means that as standard, if anything was to happen whilst you were exploring Laguna 69, the Huascarán National Park - or possibly even the city of Huaraz - you may end up out of pocket. Not so much of a concern if it’s a little tumble, financially devastating if you require a rescue helicopter to fly out and collect you.
It’s therefore essential that you have insurance that is up to scratch for your South America trip - both True Traveller and World Nomads offer coverage options for high altitude hikes.
Weather and best times to visit Laguna 69
We hiked to Laguna 69 during dry season (June), and the weather was spectacular; bright blue skies, brilliant sunshine and warm days. It provided the perfect backdrop to photos and meant we didn’t have to battle added annoyances such as wet weather.
When we visited Huaraz in December however, at the beginning of the rainy season, there were hikers who had an entirely different experience, with heavy rain that poured down - at best - in the mid afternoon, at worst throughout the entire day. The good news is that as the hike is at such a high altitude, you often get the opportunity to head above the clouds, and with the hike beginning early in the morning you may well miss the worst of the rain.
Certainly those we spoke with absolutely didn’t regret their decision to hike during the rainy season, and would do it again, but if you have the opportunity to pick and choose when you visit Huaraz, it’s something to bear in mind.